Wednesday, July 31, 2013

Recipe: Pot Au Chocolat with Cinnamon Whipped Cream (Curtis Stone)

Let's end the month with something sweet, shall we? Curtis Stone describes this decadent pot au chocolat (literally translated to pot of chocolate) as "one of the simplest recipes you've ever wished to make". This recipe takes a total of 15 minutes to prepare/cook, then you simply pop it into the fridge for 3-4 hours to set. Just before serving it to your guests, simply whip some cream with ground cinnamon and top it on the chocolate. I also added some fresh strawberries for some colour, and who will say no to strawberries, chocolate and cream? ;)

Petit pot au chocolat

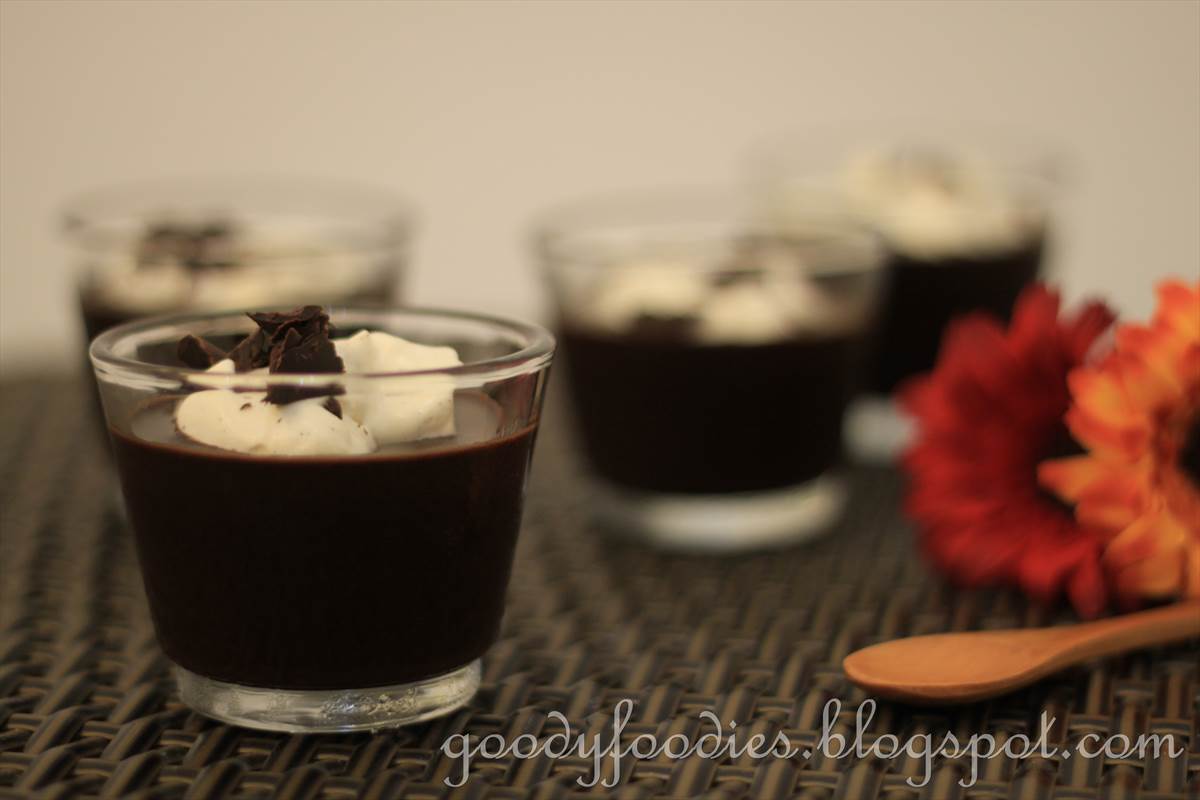
I had some guests over the other day, so I made half the amount from his original recipe. No changes made to the recipe, except that I used fleur de sel salt. I poured the chocolate mixture into 4 small glasses (petit pot au chocolat) and 2 slightly larger (ice cream cups) ones. Since this is quite a rich dessert, the small petit servings are actually perfect - too much and it can be too cloying. The chocolate had a nice silky texture. The tart strawberries complements this pot au chocolat well.


A big thank you to everyone who joined us in this month's "Cook Like a Star", next month we will be cooking like Nigella Lawson (hosted by Zoe, Joyce and Anuja) and I will also be hosting Little Thumbs Up (first post up tomorrow) with the theme "eggs".


Pot Au Chocolat with Cinnamon Whipped Cream
Recipe adapted from Curtis Stone
Preparation time: 10 minutes
Cooking Time: 5 minutes
Serves 4-6

Ingredients
1 cup full cream milk
250g semi-sweet chocolate, chopped into small pieces, plus extra for shaving
3 large egg yolks
1 tsp vanilla extract
1/8 tsp fleur de sel salt
1/2 cup whipping cream
1/2 tsp cinnamon

To garnish
2 strawberries, cut into quarters


1. Place milk in a small saucepan over medium low heat and bring to a simmer, being careful not to scorch. Add the chocolate and continue stirring with a rubber spatula until smooth and all the chocolate has melted. Remove from heat.

2. Meanwhile, beat the yolks in a large bowl using a whisk. Slowly pour the chocolate mixture into the eggs, one ladle full at a time, being careful not to scramble the eggs. Keep whisking. Once half the melted chocolate is incorporated, pour the rest in with the vanilla and salt and mix thoroughly.

3. Transfer mixture to a jug and carefully pour into 4-6 ramekins or glasses (depending on size of glass you use) and refrigerate, uncovered, for ½ hour. Remove and cover with plastic wrap and return to the fridge for about 3-4 hours, up to one day in advance. The plastic wrap will prevent a skin from forming.

4. Before serving, bring chocolate pots to room temperature for about 10 minutes prior to serving. Whip the cream lightly to soft peaks and fold in the cinnamon. Spoon over the chocolate pots and tap glass on your hand to distribute the cream over the top. This will ensure cream in every bite! Using a vegetable peeler,
scrape the remaining chocolate over the cream to make chocolate curls. Serve immediately. Garnish with strawberries if you like.


If you enjoyed reading my posts, LIKE me on Facebook! Thanks :)


*********************************
I am submitting this to the "Cook Like Curtis Stone" bloghop which I am co-hosting with Zoe of Bake for Happy Kids and Grace of Life Can Be Simple. To join, simply cook or bake any recipe from any Curtis Stone websites or cookbooks and blog hop with us for the whole month of July 2013.

Your post must be a current post i.e. posted in July 2013 - please do not link older posts.Please mention Cook like a Star in your post and link back to Zoe of Bake for Happy Kids, Grace of Life Can Be Simple and Baby Sumo of Eat your heart out.

You can get the HTML code here: get the InLinkz code (Click on the link, copy and paste the HTML code into your blog post where you want the blog hop list to appear. Make sure you are in HTML mode when you paste in the code)

Happy cooking! Do check out the other bloggers recipe below:


Tuesday, July 30, 2013

Recipe: Finger-licking roasted chicken wings 烧鸡翼

It's finger-licking good!

I have a weakness for chicken wings, especially those that have been grilled, roasted or deep fried. At home, we only cook the grilled or roasted versions since it is more healthy and creates less mess in the kitchen. This recipe comes from my friend, Jessie and when I first saw it on her blog, I knew that I wanted to make these, pronto! I did and for some reason, I thought I have posted this recipe here and only saw that it was sitting in my draft folder when I doing some spring cleaning on my blog.

Roasted chicken wings


The deep caramelised skin looks simply tempting, doesn't it? It tastes as good as it looks, and we love making this for dinner and even lunch sometimes when I'm feeling really greedy. My kids love chicken wings too, so if you come to our home on "chicken wing night", you will find all of us with a chicken wing each in our hands, oil down our chins, savouring the chicken wings and then licking our fingers after.


If given the choice I would only buy the wingette but we don't get that option at the wet market here (you need to get both the wingette and drumette) but luckily for me, Baby D and his daddy likes that the drumette. Win-win for the whole family.


I have made this countless times now, so I know this recipe is great. The only thing that I have changed is that I have increased the light soy sauce since I prefer mine a little saltier. Hands up, who wants a wing? ;)


Btw, don't forget to join me beginning 1 August 2013 for Little Thumbs Up event that I will be hosting. Cook any recipes containing "eggs" and link up to my post next month. Thanks in advance for your support! :)


Finger-licking roasted chicken wings (烧鸡翼)
Recipe by Baby Sumo, adapted from Jessie-CookingMoments
Preparation time: 10 minutes
Cooking time: 50-55 minutes
Serves 3-4

Ingredients
1kg chicken wings (approx. 10 no)
3-4 cloves garlic, crushed
3 tbsp extra virgin olive oil
1 tbsp soft brown sugar
1 1/3 tbsp honey
1 1/3 tbsp Dijon mustard
3 tbsp Worcestershire sauce
1 1/2 tbsp light soy sauce
2/3 tsp sesame oil
2/3 tsp paprika
2/3 tsp salt
1/3 tsp five spice powder
1/3 tsp ground ginger
1/2 tsp garlic powder

To garnish
4 basil leaves, thinly cut


1. Wash the chicken wings and pat dry with kitchen towel.

2. Mix all the ingredients (except chicken wings) in a large bowl. Place chicken wings in the bowl and mix, ensuring each piece is coated well with the sauce. Cover with cling wrap and refrigerate for at least 6 hours or overnight.

3. Line a large baking tray with aluminium foil. Place the chicken wings in a single layer on the lined tray. Pour half the marination sauce evenly over the chicken wings.

4. Cook for 30 minutes in a 170°C pre-heated oven in lower shelf. After 30 minutes, flip the wings to the other side, add the remaining marination sauce and cook for another 20 minutes or until golden. Remove some of the marinade which has pooled on the baking tray - this can be used as a dip for your chicken wings later.  If you find that the chicken wings skin do not look as crispy or golden as you would have liked it, then place the baking tray on the higher shelf under the grill for 4-5 minutes. This will give the chicken wings a nice, crispy skin. Remember to watch your wings, as you do not want them to get burnt at this point. Remove from oven, garnish with basil and serve immediately.

5. You can reduce the remaining marination sauce in a saucepan as a dipping sauce, if you please.

For dinner, we would supplement the chicken wings with some sides such as roasted pumpkin with rosemary and thyme.


If you enjoyed reading my posts, LIKE me on Facebook! Thanks ;)

*I am submitting this to Little Thumb's Up "Ginger" event hosted by Alvin @ Chef and Sommelier.

Monday, July 29, 2013

Lunch @ The Atholl Hotel, Aberdeen, Scotland

When researching the restaurants we should visit around Aberdeen, a restaurant would  usually get into our shortlist if it served Scottish food (or produce). Atholl Hotel's name came up a few times, and my FIL also mentioned that this is a reputable hotel in Aberdeen.

Located in a beautiful granite building


We didn't make any reservations for lunch, and it looked busy in the restaurant but luckily there could still accommodate us. The service staff was friendly, and our orders did not take too long to arrive at our table.

Restaurant interior

The homemade soup of the day was green pea and ham soup (£3.95), served with a crusty roll. We ordered this British classic as well as the Homemade Scotch Broth (£3.95), a traditional Scottish broth/soup. These were both thick and hearty, I prefer the Scotch Broth but Hubby enjoyed both.


Green pea and ham soup


Homemade Scotch Broth - something which Hubby's mum always makes for him when he was younger

The kids shared some chicken nuggets with chips

Moist chicken and crispy batter

My MIL opted for the warm breaded mushrooms (£5.95), which is served with a side salad and garlic and chive mayonnaise. I tried one and the mushrooms were juicy and the breaded crust was so crispy. Something I wouldn't mind having as a starter to the meal.


My FIL ordered the stovies (£5.95) without a second thought - this was the special of the day. Stovies is a traditional Scottish meat and potato stew served with oatcakes - you can find the recipe here. The portion was huge, Hubby had some of this since he had a light main. It was very tasty, one of the best ones we had during our trip.


Hubby had the pear poached in white wine (£5.95 - starter portion). This starter portion was quite substantial in size, and very attractively presented. The pear was soft and sweet, served with salad of feta cheese, pine nuts and honey vinaigrette.


After the soup, I wanted something light for my mains, so this prawn platter (£5.95) was just perfect. It's just like prawn cocktail but served on a plate - cold water prawns topped with a Marie sauce with a salad, and buttered brown bread. This was one of my favorite sandwich fillers in the past.We decided to skip desserts here since we were already quite full and the kids wanted an ice cream cone each.


Verdict: Lovely ambiance, good service and the food is fresh, tasty and comes in generous portions. Great place to try some Scottish food and produce.

Location: Atholl Hotel, 54 King’s Gate, Aberdeen, Scotland, AB15 4YN

Tel: +44 (0) 1224 323505

Website: http://www.atholl-aberdeen.co.uk/
GPS Coordinates: 57.146927,-2.136286

Sunday, July 28, 2013

Recipe: Gula melaka avocado milkshake/juice

Recently, we managed to score some reasonably priced avocados (still not cheap but we love this fruit so much!). Other than salads, guacamole and baked eggs, we have found a wonderful way of using this fruit - making it into a juice or milkshake. 

Avocado milkshake is a popular drink in Indonesia, Phillipines, Vietnam and many other countries. Avocado milkshake is very creamy and rich, and you can flavour it with either honey, or syrup. In Indonesia, the milkshake is served with a chocolate syrup. I decided to make a gula melaka (palm sugar) syrup to go with the milkshake. You can actually get the gula melaka syrup in bottles nowadays, but you can easily make it from scratch - simply shave some gula melaka and place it in a saucepan with some water and heat until sugar has melted. It's as simple as that. Do make the syrup first as it needs time to cool down and thicken. The good thing about making your own milkshake is that you can control the sweetness. 

Gula melaka avocado milkshake


One large avocado can yield two glasses of milkshake. We could almost have it as a meal before it is so rich and hence filling. Since high avocado intake is often linked to lower blood cholesterol levels, this is a fruit we don't mind indulging in more. One more avocado milkshake here, please;)


Gula melaka avocado milkshake
Recipe by Baby Sumo
Preparation time: 10 minutes
Cooking time: 2-3 minutes
Serves 2

Ingredients
1 large ripe avocado
1 calamansi lime
1 1/2 cup fresh milk
12-15 ice cubes

For the gula melaka syrup
3 tbsp shaved gula melaka
6 tbsp water


1. Prepare the gula melaka syrup first, at least 15 minutes before you make the milkshake. Place the shaved gula melaka and water in a small saucepan over low heat, until the sugar has melted. Remove from heat and place in a small bowl. It will thicken after cooling down.

2. To pit and peel the avocado, first you need to find the stalk and remove it. Hold it horizontally, with a knife through the centre until you hit the seed then move the knife in a circular motion until you go all the away around. Twist the avocado halves in opposite direction and it will come apart easily into 2 halves. Sink the knife into the avocado seed and remove.The avocado skin should peel off easily (use your hands). Slice into thick cubes and set aside. Sprinkle the avocados with the lime juice to avoid discolouration.

3. Place the avocado, milk and ice cubes in the blender and blend until smooth. Add gula melaka syrup to taste, I used about 4-5 teaspoons - give it a final blitz before serving.

I get to use my KitchenAid blender ;)


4. Serve with a few swirls of gula melaka syrup on top.


Note: You can also buy gula melaka syrup in bottles from the supermarket.


If you enjoyed reading my posts, LIKE me on Facebook! Thanks ;)

Saturday, July 27, 2013

Recipe: Chinese pork ribs stew with fish maw, mushroom, and dried scallops

During Chinese New Year every year, we would stock up on fish maw 鱼鳔 as it is a little harder to find similar quality ones to the one we like the rest of the year. You can read more about the fish maw that we usually get here. The fish maw have already been deep fried, so all you need to do is to soak them in cold water for 1 hour before cooking.

Chinese pork ribs stew with fish mar, mushroom and dried scallops


Using this fish maw, we have developed a recipe that we have been cooking over and over again in the past months. Why do we like this recipe so much? It is nourishing, delicious and best of all, it is easy to cook - it is a one-pot stew that we love. Usually we will add pork ribs, mushrooms, dried scallops, peanut, ginger slices, fish maw and even lettuce (that's our vegetable quota for the meal sorted). The stew is quite "soupy" (the way we like it), and it gets a lot of its flavour from the pork ribs and dried scallops. Another ingredient that we sometimes add is radish, simply cut them into 1-inch thickness and place it inside the stew at the same time as the ribs.


One-pot stew

Boil a pot of rice, chop up some garlic/chillies to dip with soy sauce and dinner is ready. Easy peasy! What's not to love about this stew?


Nourishing and delicious


Used my last batch of fish maw for this... we'll have to stock up more during CNY period next yr!


Pork ribs stew with fish maw, mushroom and dried scallops
Recipe by Baby Sumo
Preparation time: 10-15 minutes
Cooking time: 2 - 2 1/4 hours
Serves 4

Ingredients
600g pork ribs (ask your butcher to cut it into 2 inch lengths)
30g peanut, soaked for 30 minutes
10pcs mushroom, rehydrated
80g fish maw, soaked for 1 hour in cold water, drained and cut into 2 inch lengths
20 pcs small dried scallops
6 slices old ginger
6 cloves garlic, finely chopped
1.2l water
1/2 tsp salt
2 tbsp cooking oil

To garnish
8 pieces lettuce
1 red chilli, thinly sliced


1. In a pot, heat the oil over a medium high heat. Add the garlic and ginger and cook for 2 minutes until the garlic is lightly browned.

2. Add the pork ribs and brown the meat slightly. Then, add the peanut and mushroom and cook for 1 minute. Then, add the water and bring to the boil. Once boiling, lower heat to low and simmer for 1 1/2 hours. Then, add the fish maw and dried scallops and cook for a further 30 minutes. The stew is intended to be quite "soupy". Season with some salt, to taste.

3. Arrange lettuce leaves in a claypot and ladle over the pork rib stew. Garnish with red chilli and serve immediately with rice. An excellent one-pot meal!

Note: If using radish, add in at the same time as the pork ribs.


Click here for an alternative recipe for fish maw with mushrooms stew.


If you enjoyed reading my posts, LIKE me on Facebook! Thanks ;)

*I am submitting this to Little Thumb's Up "Ginger" event hosted by Alvin @ Chef and Sommelier.

Friday, July 26, 2013

Recipe: Grilled king prawn with olive oil, lemon juice and fresh parsley (Curtis Stone)

When seafood is fresh, it will only require simple preparation and minimal cooking - this will also allow the natural sweetness of the seafood to shine through. I decided to give this Curtis Stone recipe a go for lunch, since prep and cooking time only takes around 10 mins.

Grilled king prawn with olive oil, lemon juice and fresh parsley

For this recipe, the prawns can either be cooked with its shell on or peel it before cooking (leaving tails on) for ease of eating. The prawns will take about 1 minute to cook (on the BBQ or griddle pan), then simply drizzle over with lemon juice, chopped chillies and parsley and it is ready to be served.

One thing to note about this recipe is that the original recipe suggests 3 lemons for 20 prawns (since I was cooking 10 prawns that would be 1 1/2 lemons) but I have reduced it to 1/2 lemon and I still found it way too sour for my liking and overpowers the taste of the prawns. The taste is definitely appetizing, but I would reduce it to 1/4 lemon for 10 prawns the next time. The chillies give it a nice spicy kick.


A great simple recipe for the BBQ on a hot summers day.  


Grilled king prawn with olive oil, lemon juice and fresh parsley
Recipe adapted from Curtis Stone
Preparation time: 10 minutes
Cooking time: 1 - 2 minutes
Serves 2

Ingredients
10 jumbo shrimp (king prawns), peeled, deveined and with tails intact
1 1/2 tbsp extra virgin olive oil
1 small fresh red chilli, finely chopped
Zest & juice of 1 lemon (I would reduce to 1/4 lemon next time)
1 tbsp flat leaf parsley, coarsely chopped
Sea salt


1. Preheat a BBQ or griddle (grill) pan to a high heat.

2. Drizzle the shrimp (prawns) with 1 tbsp olive oil and place them flesh-side down onto the BBQ or grill for 30-60 seconds (if the shell is on). If shells have been removed, then just place on any side (doesn't matter as you're flipping it over).

3. Turn the shrimp (prawns) over, add the chilli, lemon zest and parsley, and squeeze over the lemon juice.

4. As soon as the shrimp (prawns) are cooked to a solid white colour (about another 30-60 seconds), remove from the heat, drizzle a little extra olive oil over them and serve immediately. Season with some salt if necessary.


If you enjoyed reading my posts, LIKE me on Facebook! Thanks :)


*********************************
I am submitting this to the "Cook Like Curtis Stone" bloghop which I am co-hosting with Zoe of Bake for Happy Kids and Grace of Life Can Be Simple. To join, simply cook or bake any recipe from any Curtis Stone websites or cookbooks and blog hop with us for the whole month of July 2013.

Your post must be a current post i.e. posted in July 2013 - please do not link older posts.Please mention Cook like a Star in your post and link back to Zoe of Bake for Happy Kids, Grace of Life Can Be Simple and Baby Sumo of Eat your heart out.

You can get the HTML code here: get the InLinkz code (Click on the link, copy and paste the HTML code into your blog post where you want the blog hop list to appear. Make sure you are in HTML mode when you paste in the code)

Happy cooking! Do check out the other bloggers recipe below:


Related Posts Plugin for WordPress, Blogger...